What roof pitch means
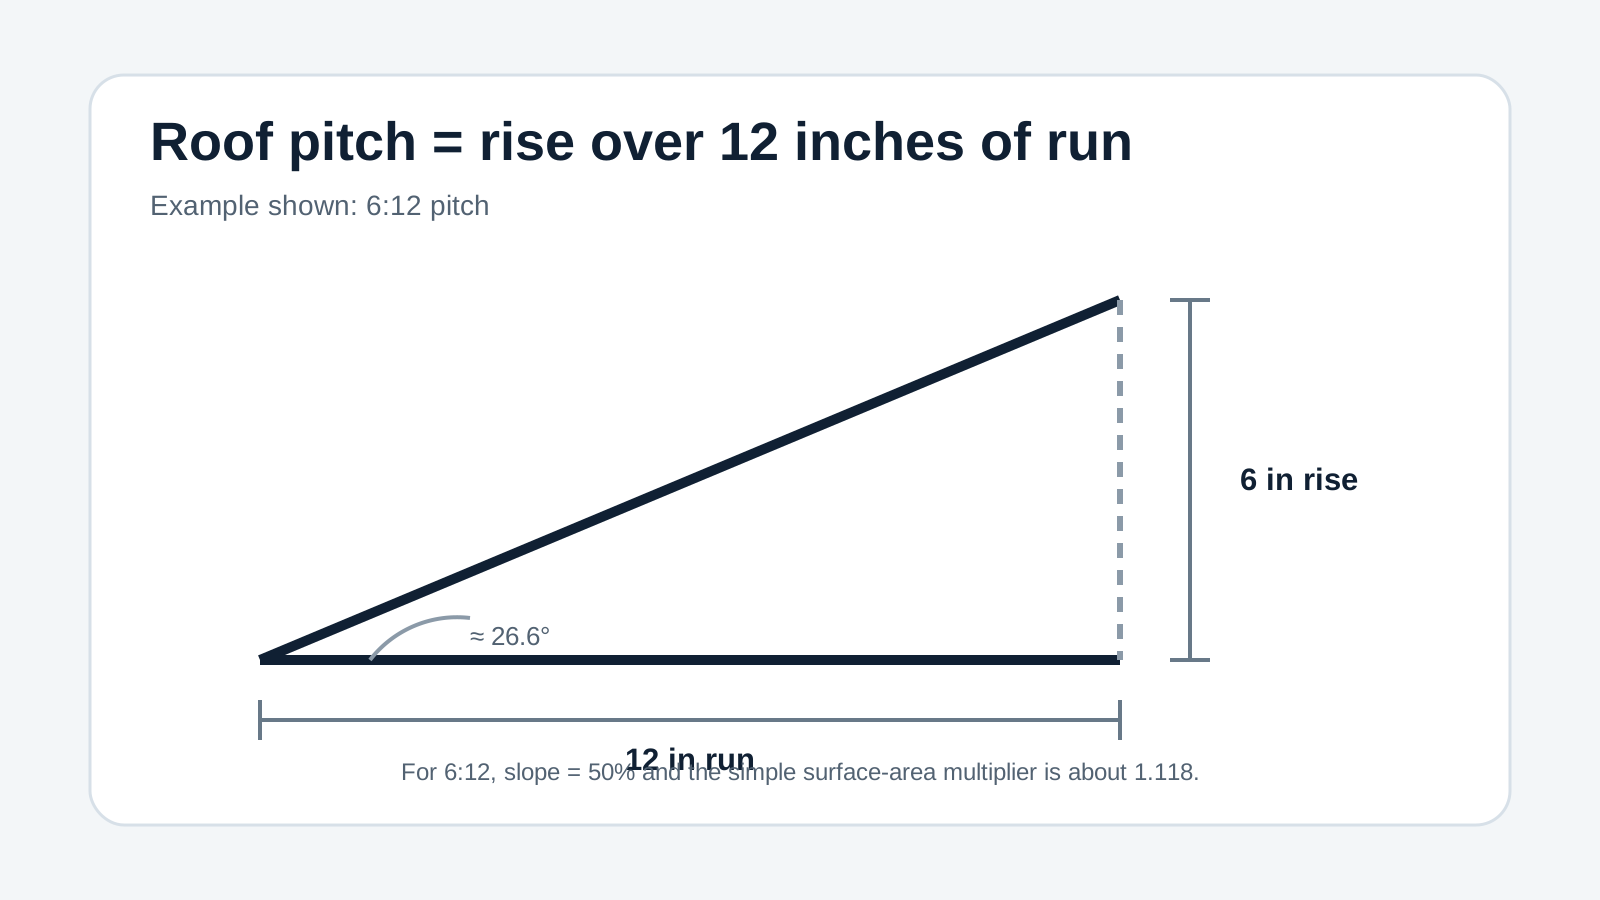
In U.S. residential construction, pitch is commonly written as rise:run. The run is usually normalized to 12 inches. A 4:12 roof rises 4 inches for every 12 inches of horizontal distance; an 8:12 roof rises 8 inches over the same run.
Pitch is related to roof angle and slope percentage, but those are different ways of describing the same incline. Use the Roof Pitch Calculator to convert between them.
Pitch, angle, slope and area multiplier
| Pitch | Approx. angle | Slope | Simple area multiplier |
|---|---|---|---|
| 3:12 | 14.0° | 25% | 1.031 |
| 4:12 | 18.4° | 33.3% | 1.054 |
| 6:12 | 26.6° | 50% | 1.118 |
| 8:12 | 33.7° | 66.7% | 1.202 |
| 10:12 | 39.8° | 83.3% | 1.302 |
| 12:12 | 45.0° | 100% | 1.414 |
The multiplier estimates sloped surface from horizontal plan area for a simple roof plane. It does not add eaves, dormers, valleys, waste or separate roof sections.
Method 1: read the pitch from plans or an existing report
Construction drawings, truss documents, prior roofing measurements or an aerial measurement report may already state the pitch for each plane. This is the simplest option because it avoids field measurement entirely. Verify that the document matches the current roof, especially if additions or alterations were made later.
Method 2: measure from accessible attic framing
If the underside of a rafter is safely accessible from a stable attic floor or platform, pitch can be measured from the framing without standing on the roof surface. Using a level, establish a known horizontal run and measure the vertical rise to the rafter. Convert that measurement to rise per 12 inches of run.
Do not step between ceiling joists or onto surfaces that are not designed for foot traffic. Attics can contain exposed nails, wiring, insulation and fragile ceiling material. If access is unsafe or uncertain, use a professional measurement instead.
Method 3: use a known rise and run from building geometry
For a simple symmetrical gable, plans or measured building dimensions may provide enough information to derive pitch. If the roof rises 5 feet from wall plate to ridge over a horizontal half-span of 10 feet, the ratio is 5:10. Converting that to a 12-inch run gives 6:12.
Complex roofs may have multiple pitches, so do not assume one ratio describes every plane.
How the math works
For a pitch written as rise:12:
- Slope percentage = rise ÷ 12 × 100.
- Angle = arctangent(rise ÷ 12).
- Area multiplier = √(12² + rise²) ÷ 12.
For a 6:12 roof, slope = 6 ÷ 12 × 100 = 50%. The angle is about 26.6°. The simple area multiplier is √(144 + 36) ÷ 12 ≈ 1.118.
Why pitch matters for roof quantity
A sloped surface is longer than its horizontal projection. Suppose a simple roof has 1,800 sq ft of horizontal plan area. At 6:12 pitch, multiplying 1,800 × 1.118 gives about 2,012 sq ft of sloped surface before overhang corrections, separate roof planes or waste.
That surface can then be converted to roofing squares with the Roofing Square Calculator.
Why pitch can affect project cost
Pitch can influence labor, staging, fall-protection methods, material handling and installation speed. Steeper roofs can also make chimney, skylight and flashing work more difficult. A roofing estimate should therefore consider both measured surface and complexity rather than using area alone.
Use the Roof Replacement Cost Calculator after you have a reasonable roof-area and pitch estimate.
Common measurement mistakes
- Using the sloped rafter length as the horizontal run.
- Measuring rise over a run other than 12 inches and forgetting to normalize it.
- Assuming every roof plane has the same pitch.
- Using interior floor area as roof plan area.
- Applying a pitch multiplier and then adding the same slope effect again elsewhere.
- Taking unnecessary fall risk just to obtain a number that could be read from plans or measured professionally.
Frequently asked questions
What angle is a 6:12 roof?
Approximately 26.6 degrees.
Is a 6:12 pitch a 50% slope?
Yes. Six inches of rise over 12 inches of run equals 0.5, or 50%.
Does roof pitch tell me total roof area?
No. Pitch provides a slope relationship and can supply an area multiplier for simple planes. You still need the horizontal plan dimensions, overhangs and each roof section.
Can I measure pitch from inside the attic?
Often, if the framing is safely accessible. Avoid walking on unsupported ceiling areas and do not enter an attic that is unsafe or unfamiliar. Professional measurement is a better choice when access is uncertain.
Detailed planning notes for How To Measure Roof Pitch
The sections below expand this guide so you can move from a quick answer to a more complete homeowner planning process. They focus on measurements, scope, quote comparison and the questions that reduce expensive surprises.
Roofing details that deserve a second look
Roofing prices and material quantities are unusually sensitive to scope. A homeowner may know the house is 2,000 square feet, but the roof surface can be larger because of pitch, overhangs, attached garages, porches, dormers, valleys and other geometry. That is why a useful roof budget starts with measured roof area rather than living area alone. When comparing bids, verify whether each contractor measured the same roof surface and whether the proposal includes tear-off, disposal, underlayment, flashing, ventilation, edge metal, starter materials, ridge components and any expected deck repair.
Material labels can also hide meaningful differences. “Asphalt shingles” may refer to different product lines, wind ratings, impact ratings, algae protection, warranties and installation systems. Metal roofing can mean exposed-fastener panels, concealed-fastener systems or standing seam, each with different labor and accessory requirements. A low headline price is not automatically a better value if important accessories or labor steps are missing. Ask for product names, manufacturer specifications and a written scope that makes exclusions obvious.
Local climate and code matter too. Wind, snow, hail, wildfire exposure, coastal conditions and ventilation requirements can change the recommended assembly. Permit rules and inspection requirements vary by jurisdiction. Use the Roof Replacement Cost Calculator, Roofing Square Calculator and Roof Pitch Calculator as planning tools, then verify final details with a qualified local roofer. For independent industry information, review consumer resources from the National Roofing Contractors Association.
Measure twice before you order material
Quantity errors usually come from the inputs, not the formula. Recheck length, width, depth, pitch or surface area and make sure every measurement uses the same unit. For irregular projects, break the area into simple rectangles, triangles or other manageable shapes, calculate them separately, then add the results. This is usually more reliable than forcing a complicated space into one rough measurement.
After calculating the theoretical quantity, think about waste and purchase increments. Cuts, breakage, compaction, spillage, pattern matching and packaging can create a gap between calculated quantity and what you actually need to buy. The correct allowance depends on the material and project. Avoid adding a large arbitrary percentage “just in case”; instead, use supplier packaging, installation guidance and the shape of the project to choose a sensible buffer.
Finally, confirm the order with the supplier or installer when mistakes would be expensive. Ask how the product is sold, whether quantities are rounded, whether there is a minimum order and how returns are handled. Save your measurements and calculation so you can explain the order later and compare it with the contractor's takeoff.
A practical way to use this HomeCostEngine guide
Use this article in three passes. First, understand the cost or quantity drivers so you know what information matters. Second, run the related calculator with your own measurements instead of relying on a national average. Third, compare the result with local supplier prices or written contractor proposals. That sequence turns a general online guide into a project-specific planning tool.
Keep a simple project file with measurements, screenshots, product names, quotes and notes from contractor conversations. When a number changes, update the assumption instead of starting from scratch. This is especially useful when bids arrive weeks apart or when one proposal contains a different material, warranty or scope. A documented baseline helps you notice meaningful differences rather than being distracted by the final total alone.
Remember that HomeCostEngine estimates are for budgeting and education. They do not include every local code requirement, permit rule, hidden condition or labor-market difference, and they are not a substitute for a site inspection. For structural, electrical, plumbing, HVAC, roofing or other work where safety and code compliance matter, verify the final plan with qualified local professionals. If a contractor discovers hidden damage after work begins, ask for photos, an explanation and a written change order before approving additional work whenever practical.
Common mistakes that make online estimates less accurate
- Using living area instead of project area. Roof surface, paintable wall area, flooring area and landscape beds can all differ from the home's advertised square footage.
- Comparing incomplete scopes. Demolition, disposal, preparation, permits, delivery and accessories may be included in one quote and excluded from another.
- Ignoring purchase increments. Bags, cartons, bundles, truckloads and supplier minimums can force the real order above the theoretical calculation.
- Assuming one national price fits every location. Labor rates, access, codes, climate and material availability vary across U.S. markets.
- Choosing only on price. Product specification, workmanship, warranty, schedule and clarity of scope can be as important as the lowest total.
Before you approve the project
Recheck the final measurements and confirm who is responsible for permits, site protection, disposal and cleanup. Make sure important materials are identified by product or performance specification rather than a vague category. Review deposit and progress-payment terms, start and completion expectations, warranty language and the process for unexpected conditions. Keep copies of signed documents and receipts.
If the project is still in the research stage, use the related HomeCostEngine calculators and articles linked throughout this page to test more than one scenario. Changing the project size, material or labor assumption can show which inputs have the biggest effect on the budget. That is usually more useful than chasing one “perfect” average price from the internet.